Custom Google Reports
Google Analytics has thousands of metric and dimension combinations, but they can’t always measure the things that are unique to your business. Adding a custom dimension is a simple way to collect data that measures your unique values.
This post demonstrates how to define custom dimensions in Google Analytics and collect the user defined variable via a Google Tag Manager fire, ultimately building a custom analytics report to display the value.
In this example, I have a business question about which of my writers has the most engaging content. On our blog, I need to know how the page analytics are segmented by the Author.
Step 1: Define the dimension
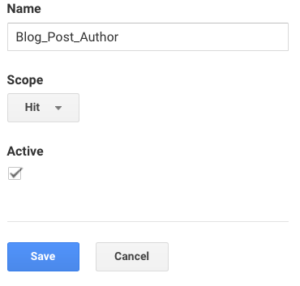
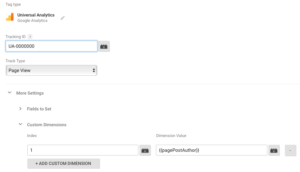
In Google Analytics, define a new custom dimension under Admin> CustomDefinitions.
I want to know how my Authors posts compare against each other, so my dimension is Author. My metrics are page level, like average time on page, unique pageviews and bounce rate.
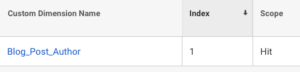
I’ll define my variable as Blog_Post_Author. I’ll cover scope in more detail in a later post, but for this example I’m using a hit based scope. The Index value will be used later to index the dimension in the analytics tag.
Step 2: Define the Data Layer Variable
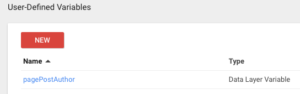
In Google Tag Manager Variables, create a Data Layer variable with the same case-sensitive label used on the object in the web pages data layer.
To get this value, you can use Google Tag Manager’s built in preview mode to view the variable name in the data layer when you load the screen.

My web object is named pagePostAuthor, this is my user-defined data layer variable name.
Step 3: Add the Dimension to the Google Analytics Tag
I’ve referenced the dimension index value as well as the user defined data layer variable in the Google Analytics tag. I’m using a pageview hit to pass this value, but I could use it in an event fire or other tag manager fire.
Now when my tag fires, I can view the variable fires with the Google Analytics pageview hit in the tag recording.
Step 4: Create the Custom Google Analytics Report
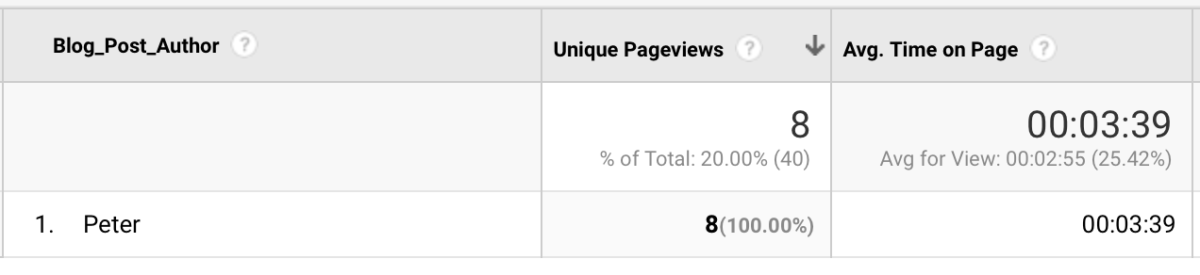
To finish the loop, I create a custom report in Google Analytics with my created value as the primary dimension and my KPIs (Unique pages, average time on page, and bounce rate) as the defined report metrics.
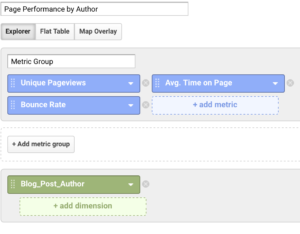
My output will look like this.

Now I am able to answer my original business question and can compare my blog post authors page performance metrics.
Happy tagging.
Peter